There is no doubt that the Oculus Quest 2 or the Meta Quest 2 for newcomers is one of the greatest and easiest ways to get yourself immersed in VR. With a low-cost entry-level price and the rather excellent Oculus store with over 800 games available at your fingertips, you’d be hard pushed to find a better option. Almost 15 million people agree with me proving that the Quest 2 is certainly the most popular headset option currently on the market.
But what if you want more? If like me you want it all, then you’ve come to the right place! As amazing as the Oculus store can be for content, it’s complete lightweight when you compare it to Steam. Those lucky PCVR users have access to Steam which has a nearly uncountable number of VR titles currently available and counting. So if you’re lucky enough to own a modern PC and you have a Quest 2, then you’re in luck. Today we’re sharing how to connect your Oculus Quest 2 to PC and even better … how to connect your Oculus Quest 2 to Steam! Let’s get into it
Oculus Quest 2 PC Link – How to Wire a Connection to Your PC, Quick and Easy Setup
The easiest and most reliable way to connect your PC to your Quest 2 is to use a wired connection. A USB-C cable does the trick. It’s easy to connect up and most importantly, provides a constant reliable connection with no interruptions. The only downside is you lose some freedom of movement with being constantly connected to your PC with a cable. The USB-C cable that comes with your Quest 2 is decent but nowhere near long enough for proper VR gaming.
Buying a longer cable is a must if you’re considering tethering your Quest 2 to your PC. Five-meter length cables are recommended for a more flexible immersive experience. You can pick up the official Meta Quest 2 five-meter cable from supported retailers or online but it will set you back upwards of $100. You can always shop around for 3rd party suppliers but you have to ensure it’s a high-quality cable with shielding and a transfer speed of up to 5GBPS. Check out a far more affordable option here.
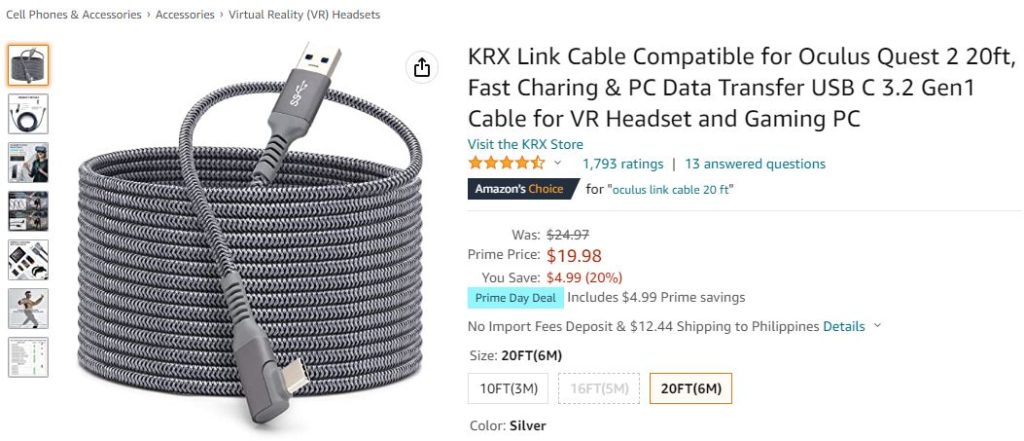
Screenshot from Amazon
Once you’ve purchased a suitable cable then you’re all set to follow the steps below:
Step 1: On your PC, download the official Oculus PC application for PC Link and Air Link. You can download it directly from Meta by visiting this page. Then click the ‘Download Software’ button in the Quest 2 section.
Step 2: Once the software has been installed successfully on your PC. Open the application and follow the first-time setup guide.
Step 3: Connect your headset to your PC with the USB-C cable and choose the correct headset (Quest 2) in the first time setup
Step 4: That’s pretty much it. The app will install the relevant drivers and your PC will recognize your Quest 2 from here on out every time you connect it to your PC with the cable.
Step 5: Open up Steam and install SteamVR to get access to the vast library on offer. You may need to run through some first time use tutorials etc when you first launch SteamVR but it’s pretty self-explanatory.
That’s pretty much it. After the initial setup, it simply becomes a plug-and-play experience. The advantage of linking by cable is the fast reliable connection and the downside is the restriction it places on your movements. Not for everyone but a quick and simple to get to grips with.
AirLink – How to Connect Wirelessly to Your PC, No Cables Needed
So what’s better than plugging into the power of your PC? Well, plugging in without any cables of course! AirLink is the perfect complement to the Quest 2 experience. As long as you have decent wi-fi and a fast router with good coverage, then you’re in for a treat. The power of your PC and all the amazing games right at your fingertips with no wires tying you down or tripping you up! So how exactly do you set up and use AirLink I hear you ask? Let’s find out.
Step 1: Same as before. Visit the Meta website and download the software on your PC
Step 2: Once your PC software is installed and up and running, switch over to your headset. Plonk it on your head and power up. After boot up, go to the quick menu settings.
Step 3: Locate ‘Experimental Features’ in the settings menu and toggle the ‘Enable Air Link’ option
Step 4: You’re pretty much done. As long as the oculus store is running on your PC and your Headset and your PC are both on the same Wi-Fi network, you’re golden.
Step 5: Click continue and then select the large box that says ‘Oculus Air Link’. The headset should ask you if you want to pair it with your PC which will be listed. Click okay and let the magic happen!
Step 6: If successful, the PC version of Oculus Home will load up in your headset. You can easily bring up your PC’s desktop screens by selecting them from the shortcut menu.
Step 7: From your desktop, make sure to load up SteamVR and take advantage of all they have to offer.
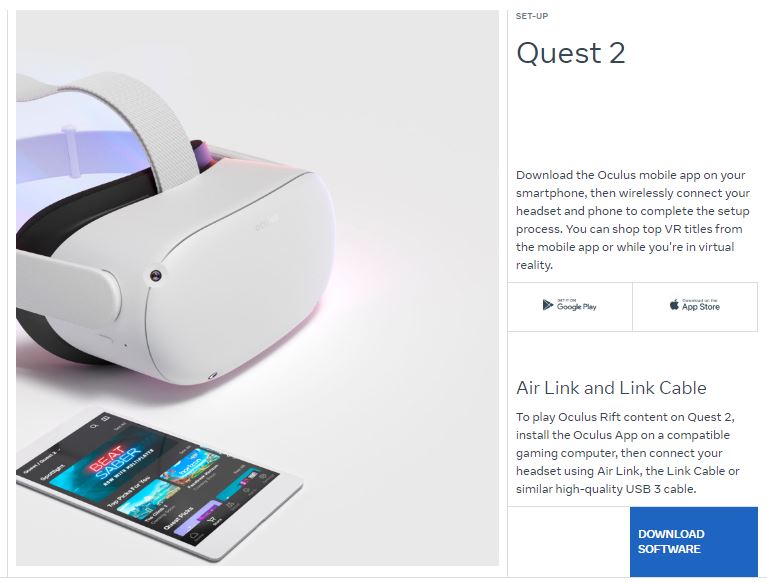
Screenshot from Facebook Store
Seven simple steps to powerful PC gaming from the comfort of your sofa, or your bedroom, or running around your back garden at night, whatever floats your boat! If you can wire your router via LAN to your PC you’ll get a faster more reliable connection. If you experience lag, consider checking what devices are currently using your Wi-Fi and politely kick them off. Grandma doesn’t need to be streaming Poirot on her phone while you’ve got gaming to do!!
Everyone’s experience will differ and your broadband speeds and adjacency to your router will greatly influence your experience. Find what works for you and stick to it. If you really want to go down a rabbit hole, you can look into port forwarding and creating a dedicated wi-fi channel just for VR but that can be needlessly technical. Test the basics first and if it’s not broken, don’t fix it!
Bonus Content – Virtual Desktop, The Mac Daddy of Wireless Connections
We weren’t always blessed with the now reliable AirLink. As is apparent from the steps above, AirLink is still considered an experimental feature and it has received many improvements since its early beta days. Before AirLink, we had another excellent alternative. Virtual Desktop! Released years prior on PC and then released again on the Oculus store for Quest & Quest 2, Virtual Desktop is a powerful application that seamlessly pairs your headset to your desktop PC and gives you full control of your PC over a wireless connection. Some might say that it was so good, it inspired the Meta team to create AirLink in the first place!
Setup is easy and no need for a list of steps. Just install the app on your headset and the first-time wizard will guide you through the process. You’ll be up and running in no time!
The principles are the same, and the end result is access to your desktop over your wi-fi connection. Some say it’s still superior to AirLink with more options to tinker with and even better performances, but the differences after many updates are now negligible. It all comes down to personal choice and your budget.
AirLink is completely free to use, however currently the Virtual Desktop app in the store will set you back around 20 dollars, so bear that in mind. For me personally, you should check out AirLink first as it’s free and you’ve nothing to lose. If you like more in-depth tinkering and don’t mind paying for it, then pick up Virtual Desktop somewhere down the road. Simple!
That’s our guide folks. Hope you found it informative and easy to follow. For all your VR goodness, keep your eyes on VR Beginner’s Guide.
Or better yet. Why not compliment your new setup by checking out the very best free Steam games currently available.